

Results guaranteed.
http://www.plasma2002.com/blenderdefender/
Tuesday, October 21, 2008
What to do with all those apples...
Pretty soon, I'm going to have my hands on gobs and gobs of apples! It is getting cool enough here so that I can temporarily store some of them in a sort-of 'root cellar' that I made out of a clean galvanized trash can that is parked in the shade outside my kitchen door. (Last winter I used it to dump my woodstove ashes into.)
Speaking of root cellars, here's an excellent book about root cellars of every description: Root Cellaring by Mike and Nancy Bubel. This book and many other self-reliant topics are published by Storey Publishing http://www.storey.com . Root Cellering is the best book I've ever seen on the subject, and it's where I got the inspiration for my trashcan 'root cellar'.
Blurb on the book's front cover: "Keep your produce 'harvest fresh' in your own basement, porch, garage, or closet hideaway!"
What I'll be doing with the rest of the apples:
-- Dehydrate (rings and apple leather)...This can be done in the oven, or near a wood stove or in a dehydrator.
-- Vinegar (peels and cores)... It's fun and easy to make gourmet vinegars as well. http://purecajunsunshine.blogspot.com/2007/10/homemade-vinegar-is-fun-and-easy.html
-- Applesauce
-- Apple Pie Jam
-- 'Apple Pie Jam Leather', made with the same yummy flavors in this delicious recipe:
Miss Violet's APPLE PIE JAM
4 cups tart apples, peeled and finely chopped
2 tablespoons lemon juice
1 teaspoon ground cinnamon
1/4 teaspoon ground allspice
4 cups sugar
1 cup firmly packed light brown sugar
1 box powdered pectin
1/2 teaspoon butter
Add water to chopped apples to measure 4 cups. (This is NOT 4 cups each, but water placed on top of the diced apples to come up to the 4 cup mark.)
Place apples and water into large, heavy saucepan.
Stir in lemon juice, cinnamon and allspice. Measure sugars. Stir pectin into fruit. Add butter.
Bring mixture to full rolling boil on high heat, stirring constantly. Quickly stir in both sugars. Return to full rolling boil and boil exactly 1 minute, stirring constantly. Remove from heat. Skim off any foam with metal spoon.
Ladle quickly into hot, clean jars, leaving 1/4" headspace. Wipe jar rims and threads. Cover with two-piece lids. Screw bands on finger tight. Process in boiling water bath for 10 minutes.
-----------------------------------------
DID YOU KNOW?
Applesauce and apple leathers are considered to be good foods to eat during and after a nuclear crisis. While this is by no means a 'cure' for radiation poisoning, it does not hurt that the pectin in the apples binds with heavy metals associated with radiation poisoning. The pectin (along with some of the bound metals) is removed by the process of elimination. This helps your body to detox better. And of course, you know about how good applesauce is for you! Plus it is a comfort food that is easy to digest.
Here's a link to an excellent tutorial: Making Your Own Apple Pectin
By Sam Thayer From The Forager. Volume 1, Issue 3. August-September 2001
http://www.wildflowers-and-weeds.com/The_Forager/pectin.html
This copyrighted article may be reprinted by you for noncommercial use, if the following credit is given: This article is an excerpt from Mrs. Tightwad's Handbook #1: HOW TO SURVIVE DISASTERS AND OTHER HARD TIMES. For more information, see the left sidebar on this site: http://purecajunsunshine.blogspot.com/
Tuesday, September 2, 2008
What To Do About New Orleans?
Some say restore flood damaged New Orleans, yet others say she should be allowed to return to the waves, because we can’t fight nature forever.
I am speaking as a seventh generation New Orleanian, and if I could have my way, I'd say...
Keep the port of New Orleans open, because it is a major commercial artery into the heart of America.
Keep the French Quarter because it's on ‘high ground’ anyway. Keep all the older New Orleans and South Louisiana communities that are all on higher ground. They are doing just fine, and have been for a long, long time through many 'canes...
The ones that are not doing so well and make the biggest news (noise) are all the "newer" communities that have been built over the past sixty, seventy or so years on reclaimed swampland and low lying riverbottom land by builders and developers who were blinded by the shiny flash of money to be made...and of course all the dumb sheep followed...and more followed over the years until everybody kinda forgot that they are seriously living in harm's way.
Alligators belong in the New Orleans Ninth Ward and Lakeview areas (and many other low spots), not people.
ALL those places that are so prone to floods....turn it all back into what it originally was: some of the finest hunting and fishing lands in the world!
Friday, August 8, 2008
How to Make Free Fertilizer From Weeds
Supercharge your plants and save money by making one of nature's best free fertilizers: weed tea!
When you recycle your weeds into fertilizer, you return to the soil a powerful array of nutrients that will give your garden a kind of naturally superior boost that can't be had with most commercial fertilizers. You will also notice a dramatic improvement in the flavor of garden vegetables that have been given doses of this 'green gold' weed tea during the growing season. As a bonus, it has been noted that plants given weed tea seem to have more disease and insect resistance than plants that were fertilized with chemicals.
Weeds spend their entire lives mining valuable minerals and many other kinds of vital nutrients from the soil. You can tap into this large reservoir of free fertilizer by making a tea of chopped weeds and water. This simple brew serves as an excellent liquid fertilizer for root or foliar feeding. As a bonus, some weeds even offer insect repellent protection!
You might be surprised to learn that some weeds have more nutritional value than the average green leafy vegetable, such as spinach or kale. For instance, a common weed called Lamb's Quarter contains triple the amount of calcium, almost double the amount of beta-carotene, more than double of minerals as kale or spinach. (By the way, Lamb's Quarter is delicious to eat, but you'll probably never find it in a supermarket. Because it is so delicate, it can't easily stand up to the rigors of the commercial food chain.)
There are three easy ways to extract nature's goodness from weeds: 1) as a liquid fertilizer (either as a cooked or cold brewed tea), 2) or as a mulch, or 3) buried into the soil.
If the weeds are in the seed stage, you may want to consider making liquid fertilizer (see the next heading), rather than using them as mulch to prevent unwanted weeds from sprouting in your garden.
MULCHING WITH WEEDS
When you pull or cut weeds that have not yet gone to seed, you can simply lay them on top of the ground to serve as a mulch that will provide a small but steady trickle of nutrients. Mulches are a valuable addition to your garden because they will add nutrients to the soil and help conserve ground moisture.
At the end of the growing season, mulches can be turned into the soil, to act as a powerful soil conditioner. In just a few seasons, repeated applications of mulch can help turn the poorest soil into 'black gold' that will outperform anything you can buy for your garden.
HOW TO MAKE WEED TEA
Recipe A - Regular strength
This is a quick stovetop recipe that does not smell bad, and can be made indoors. (The other recipes smell kind of barn-yardy, and should be made outside.)
You can use either fresh or dried weeds.
'Suntea' directions: For every big handful of weeds add 2 or 3 cups of water in a glass jar and set out into the sun for a day or two (use more water if making it from fresh, less if making it from dried.)
Stovetop directions: Bring the weeds and water barely to a boil. Remove from heat and cover. Allow to cool, and to soak for a few hours, then strain.
To use: Dilute one part tea to four parts of water. If using as a foliar spray, add 1/8 to 1/4 teaspoon genuine soap (not dish detergent!). A few thin shavings off Ivory soap bar, dissolved in a bit of water will work. This will help the liquid to stay on the leaves better. A little goes a long way; more is not better. This stickum is not needed if using the brew as a root fertilizer.
Recipe B - Super concentrated fertilizer
This brew is super concentrated and should be diluted at the rate of 1 part weed juice to 10 parts water. For a stronger fertilizer, try a dilution rate of 1/3 bucket of weed juice to 2/3 bucket of water. Pour as needed over the root zone of your growing plants, then water as usual to assist in bringing the nutrients to the roots.
For foliar (leaf) feeding, make sure that the color of the solution is no darker than weak tea, and do not apply it to vegetables about to be harvested.
Although weed tea can be made at any time of the year, the best time to harvest weeds for fertilizer is in in the springtime, or just before the plants go into full flower. This is when the nutritional content is at its peak.
For roughly each pound of fresh weeds, add 8 cups of water into a container with a lid, such as a bucket. Allow to sit outside for about two to four weeks (longer in colder weather). About once a week, stir well. Hold yer nose, 'cause fermenting weeds can be quite smelly. Do not touch this concentrated liquid fertilizer with your hands! Wear gloves. This concentrate will stain, and is difficult to remove from skin and clothing.
Don't wait too long to use your liquid fertilizer. After a time, the green brew will begin to change color to grey, brown, black and maybe even white. When it has changed color, it has been too decomposed to use as high powered fertilizer, but it will make an excellent addition to the compost pile.
If you brew this from nettles, you can make a good aphid spray if dilute it at double strength: 1 cup nettle juice to 5 cups water.
Recipe C - Perpetual supply of fertilizer
This brew is a perpetual, ongoing one. Once made it can be renewed so that it is always available, without having to wait for the brew to 'finish'. Dilute at the rate given for Recipe B.
Put your greens in a sack, with a strong cord tied around the closed neck. Drop it into a bucket of water. Allow to ferment as outlined in Recipe B. After some of this liquid fertilizer has been used up, add more water and another fresh sack of greens. Repeating this process ensures you'll have a continuous supply of 'green gold'.
WHICH WEEDS AND PLANTS MAKE THE BEST FERTILIZERS?
It is best that you include a variety of plants in the brew, if you can. This way you create a broad spectrum of nutrients for your garden. Too much of one nutrient can create a deficiency in another, just like with 'people vitamins'.
Although any plant will work well in making your own fertilizers, there are some plants that really shine as particularly nutrient-rich boosters. Here are a few of my personal favorites. In another post, I'll tell you why these plants deserve a closer look!
Nettles
Comfrey
Yellow Dock
Burdock
Horsetail
Chickweed
Alfalfa (not a weed, but one of the most nutrient rich plants I know of)
This article may be reprinted by you for noncommercial use, if the following credit is given:
This article is an excerpt from Mrs. Tightwad's Handbook #5: QUICK SUBSTITUTES and EASY FORMULAS FOR OVER 100 "CAN'T-DO-WITHOUT" ITEMS. For more information, see the left sidebar on this site: http://purecajunsunshine.blogspot.com/
Friday, July 11, 2008
Don't pick a fight with an old man. If he is too old to fight, he'll just kill you
------------------------------------------------------------------------------------------------
EDITED TO ADD: I'm sorry the link to the original video clip went dead...it was a popular and outrageously hilarious clip of a young cat challenging an older one. The younger kitty was standing upright on its haunches, waving its two front paws at the older cat, in a boxing motion. Suddenly the older (and very much larger) cat springs onto the unsuspecting young whippersnapper and bowls it over. The young cat didn't get hurt...just surprised as all get out. 'twas a priceless image of a valuable lesson.
------------------------------------------------------------------------------------------------
I have a gazillion really important things that I need to do today, but I just can't stop thinking of quips and quotes that would make good captions for this video clip!
Losing an illusion makes you as wise as finding a truth.
A coward dies a thousand deaths, a brave one dies but once.
You can't negotiate with the non-negotiable.
Don't believe everything you think.
He who angers you conquers you.
Never appeal to another's 'better nature'. He may not have one.
Facts seldom change what someone wants to believe.
Convictions are more dangerous foes of truth than lies. --Friedrich Nietzche
If you don't stay on top of things, soon you will be underneath them.
I have not failed. I've just found 10,000 ways that it won't work. --Thomas A. Edison
Don't pick a fight with an old man. If he is too old to fight, he'll just kill you.
Wednesday, July 2, 2008
Get Rid of Ticks Without Poisons - Make a Homemade Tick Sweeper
Quick and easy sweepings of the campsite or yard with this homemade gizmo can help put a serious dent into the herd of ticks in your area.
Here's how it works. In order to hitch a ride onto a victim, ticks stand at the ready, usually on the tip of a blade of grass or other vegetation. When dinner on the hoof (you, your pets, livestock, wild animals) pass by, the tick quickly latches on and begins crawling around looking for a suitable place to dine.
You can beat the ticks at their own game with a 'tick sweeper'. If you've never heard of this term before, it's because I just now made it up. It perfectly describes an old handy dandy trick.
Make a white 'flag' out of a sheet and attach it to a stick. No! It's not for surrendering to the ticks with. Never, ever surrender! The idea is to slowly drag a light colored cloth lightly over the vegetation, and if there are any ticks Out There, they will quickly latch onto the cloth, in hopes of a landing a meal. Ha! There, you can clearly see them! At this point you can engage in hand to hand combat. Have handy a tweezers and a small jar of rubbing alcohol. Drop the losers into the alcohol, which will immediately immobilize and kill the ticks. This frees your attention to catching potential escapees on the tick sweeper. Deal with the ticks crawling near the edges of the cloth first, then work your way inward. Work fast, and you should nab them all.
Any size cloth will do, but a 4' x 6' size is just right for me because it floats over the grass better, plus it's easier to reach the crawlies for dispatching. An old sheet will work. An old piece of lightweight flannel cloth is even better. A towel is too heavy and will knock most of the little buggers off of their perches. Because ticks are tiny and dark colored, the drag cloth must be white or light colored, preferably a solid color, not print.
Combat Tip: Ticks can not only sense body heat, but also sense when a shadow is overhead (a meal). This puts the tick into super alert mode, and thus ready and willing to latch onto your sweeper. Wave the 'flag' sweeper over the area once or twice, before dragging the cloth over the grass.
I won't tell you what the neighbors will think...
...just do it. Show them your conquests, share this trick and be a hero in the 'hood.
This copyrighted material may be reprinted by you for noncommercial use, if the following credit is given:
This article and recipe is an excerpt from Mrs. Tightwad's Handbook #2: HOW TO MAKE HOME REMEDIES THAT REALLY WORK. For more information, see the left sidebar on this site: http://purecajunsunshine.blogspot.com/
Monday, June 16, 2008
Thursday, June 12, 2008
How To Check Any Gasoline Pump for Accuracy
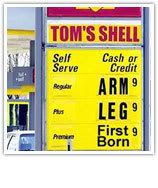
Do you ever wonder if your favorite gas station's pumps are accurate? Here is a simple and easy way to find out...and what to do about it if it's not accurate.
After all, we don't need to be giving away an arm, a leg and our firstborn...just yet.
The results of this test will not be affected by the grade of gasoline you use, or the time of day you are pumping it.
1. Put exactly ten gallons in your tank. (This test will not be accurate if you put a smidgen less than ten gallons, nor will it work if you accidentally go over ten gallons, even by just a little bit.)
2. Now, look at the price at the pump. The price you pay should be exactly ten times the per gallon price of the gas. If it is not, then the pump is not accurate.
If the pump is not accurate, this does not mean it is rigged
More often than not, the problem is with worn check valves. This means that the favor could swing either way, to you or the gas station.
The check valve is the gizmo that is supposed to make the price meter start ticking at the exact same time as the gas starts flowing. A common symptom of wearing out is when the price meter advances a few cents before the gas starts flowing.
The likelihood of the meter or the pump being deliberately rigged are very slim. The meter itself is built in such a way that it is not 'riggable'. State inspections that go along with state and federal laws are another strong deterrent to any temptations a dishonest gas vendor may have.
If you encounter a problem, report it to the gas station manager and/or to the local Commissioner of Weights and Measures.
This copyrighted article may be reprinted by you for noncommercial use, if the following credit is given:
This article is an excerpt from Mrs. Tightwad's Handbook #1: HOW TO SURVIVE DISASTERS AND OTHER HARD TIMES. For more information, see the left sidebar on this site: http://purecajunsunshine.blogspot.com/
Tuesday, June 3, 2008

Saturday, May 31, 2008
How To Remove a Tick the Fast and Easy Way
I must be the world's expert in removing ticks from people and animals. After so many years of this odious chore, I have my favorite ways of getting the job done safely.
First, a few words about how NOT to remove ticks, and why.
Although these tricks are popular, don't remove a tick by touching it with a hot ember such as one from a cigarette, or cover it with fingernail polish. It has been proven that these tactics can have a few nasty side effects, including Lyme's disease.
Aggressive removal methods causes the attached tick to regurgitate before it backs out. Diseases ride in along with the vomited material, and so there you have it. Disease-carrying tick vomit inside of you. Yuk.
Fortunately, there are better ways of removing a tick.
One of my favorite ways of removing a tick safely is with a 'tick spoon', called Ticked Off. It is the easiest, fastest way that I've ever tried.

This small spoon has a deep bowl with a "v" notch cut into it. Slip that notch under the tick and slide the critter right off, without ever touching the tick. That's it. No more worries about the tick's head and mouthparts remaining behind to fester. Because the tick is removed in one swift motion, the tick never has a chance to spew potentially dangerous vomit.
Once you try this gizmo, you won't want to be without one! They're cheap, so get a few. (About $6 for three)
I get mine from www.jefferspet.com . For their current page listing, type into the search box, the key words: Ticked Off. Jeffers is one of my favorite places to shop. I've enjoyed their top-flight customer service for the past 15 years, and their prices on pet and farm and ranch supplies are some of the lowest around.
This copyrighted material may be reprinted by you for noncommercial use, if the following credit is given:
This article and recipe is an excerpt from Mrs. Tightwad's Handbook #2: HOW TO MAKE HOME REMEDIES THAT REALLY WORK. For more information, see the left sidebar on this site: http://purecajunsunshine.blogspot.com/
First, a few words about how NOT to remove ticks, and why.
Although these tricks are popular, don't remove a tick by touching it with a hot ember such as one from a cigarette, or cover it with fingernail polish. It has been proven that these tactics can have a few nasty side effects, including Lyme's disease.
Aggressive removal methods causes the attached tick to regurgitate before it backs out. Diseases ride in along with the vomited material, and so there you have it. Disease-carrying tick vomit inside of you. Yuk.
Fortunately, there are better ways of removing a tick.
One of my favorite ways of removing a tick safely is with a 'tick spoon', called Ticked Off. It is the easiest, fastest way that I've ever tried.
This small spoon has a deep bowl with a "v" notch cut into it. Slip that notch under the tick and slide the critter right off, without ever touching the tick. That's it. No more worries about the tick's head and mouthparts remaining behind to fester. Because the tick is removed in one swift motion, the tick never has a chance to spew potentially dangerous vomit.
Once you try this gizmo, you won't want to be without one! They're cheap, so get a few. (About $6 for three)
I get mine from www.jefferspet.com . For their current page listing, type into the search box, the key words: Ticked Off. Jeffers is one of my favorite places to shop. I've enjoyed their top-flight customer service for the past 15 years, and their prices on pet and farm and ranch supplies are some of the lowest around.
This copyrighted material may be reprinted by you for noncommercial use, if the following credit is given:
This article and recipe is an excerpt from Mrs. Tightwad's Handbook #2: HOW TO MAKE HOME REMEDIES THAT REALLY WORK. For more information, see the left sidebar on this site: http://purecajunsunshine.blogspot.com/
Tuesday, May 20, 2008
Homemade Honey Cough Syrups That Really Work - Now Backed By Science
Honey works better than many over-the-counter cough syrups. A study published in the Archives of Pediatrics and Adolescent Medicine (December 2007) shows that honey works better than a leading cough syrup drug, dextromethorphan.
It looks like they've finally discovered what our grandmothers knew all along. Honey is good medicine.
An excellent article by Anne Harding for Reuters Health news service highlights this study with an interview with one of the study's authors, Ian M. Paul of Pennsylvania State University.
Here is an excerpt from the article reporting the results of the study.
My favorite simple cough syrup is plain honey. Sometimes I dress it up a bit:
Basic Honey and Lemon Cough Syrup
3 or 4 tbsp lemon juice
1 cup honey
Take one or two teaspoons every other hour or as needed. Thin it with a tiny amount of water, if desired. If water or lemon juice is added to honey, keep it refrigerated.
Most coughs come complete with a sore throat. Here's an old remedy for that.
Cajun Sore Throat Soother
Mix equal parts of honey and lemon juice and a dash of cayenne pepper, or Tabasco sauce. Before you know it, the cayenne pepper will help zap the pain of a sore throat, and will help speed healing. Honey and lemon are soothing with a healing antimicrobial effect. Honey, lemon and cayenne...now that's a potent triple whammy.
If you'd like to experiment with a whammy of a different kind, try one of these old favorites. They won't cure the cause of coughs, but they are guaranteed to make you feel much better.
COUGH SYRUP I
4 tablespoons honey
4 tablespoons water
Juice of 1/2 lemon
2 tablespoons whiskey
COUGH SYRUP II
4 tablespoons honey
2 tablespoons lemon juice
2 tablespoons whiskey
COUGH SYRUP III
1/2 c. whiskey
1/2 c. honey
Juice of 1 lemon
You can take these syrups by the spoonfuls (take 1-2 tablespoons every 3 hours) or add a couple of spoonfuls of the prepared cough syrup to a cup of hot water or tea. Mix all ingredients well before taking.
This copyrighted material may be reprinted by you for noncommercial use, if the following credit is given:
This article and recipe is an excerpt from Mrs. Tightwad's Handbook #2: HOW TO MAKE HOME REMEDIES THAT REALLY WORK. For more information, see the left sidebar on this site: http://purecajunsunshine.blogspot.com/
It looks like they've finally discovered what our grandmothers knew all along. Honey is good medicine.
An excellent article by Anne Harding for Reuters Health news service highlights this study with an interview with one of the study's authors, Ian M. Paul of Pennsylvania State University.
Here is an excerpt from the article reporting the results of the study.
To investigate, they compared buckwheat honey, a honey-flavored dextromethorphan preparation, and no treatment in 105 children who had sought treatment for nighttime coughs due to colds. Parents were surveyed on the day of the doctor's visit and on the next day, after those in the treatment groups had given their kids honey or dextromethorphan at bedtime. Among the three groups, children given honey had the greatest reduction in cough frequency and severity, and the most improved sleep, as did their parents.
There are several explanations for why honey might ease cough, Paul and his team note; its sweet, syrupy quality may be soothing to the throat, while its high antioxidant content could also be a factor. Honey also has antimicrobial effects.
Honey isn't recommended for infants younger than one year old, because of the rare but serious risk it might cause a type of food poisoning known as botulism, Paul said in an interview.
For older kids, however, it is generally safe. He and his colleagues used a dosage identical to that recommended for cough syrups: half a teaspoon for two- to five-year-olds, a teaspoon for six- to eleven-year-olds, and two teaspoons for children twelve and older.
My favorite simple cough syrup is plain honey. Sometimes I dress it up a bit:
Basic Honey and Lemon Cough Syrup
3 or 4 tbsp lemon juice
1 cup honey
Take one or two teaspoons every other hour or as needed. Thin it with a tiny amount of water, if desired. If water or lemon juice is added to honey, keep it refrigerated.
Most coughs come complete with a sore throat. Here's an old remedy for that.
Cajun Sore Throat Soother
Mix equal parts of honey and lemon juice and a dash of cayenne pepper, or Tabasco sauce. Before you know it, the cayenne pepper will help zap the pain of a sore throat, and will help speed healing. Honey and lemon are soothing with a healing antimicrobial effect. Honey, lemon and cayenne...now that's a potent triple whammy.
If you'd like to experiment with a whammy of a different kind, try one of these old favorites. They won't cure the cause of coughs, but they are guaranteed to make you feel much better.
COUGH SYRUP I
4 tablespoons honey
4 tablespoons water
Juice of 1/2 lemon
2 tablespoons whiskey
COUGH SYRUP II
4 tablespoons honey
2 tablespoons lemon juice
2 tablespoons whiskey
COUGH SYRUP III
1/2 c. whiskey
1/2 c. honey
Juice of 1 lemon
You can take these syrups by the spoonfuls (take 1-2 tablespoons every 3 hours) or add a couple of spoonfuls of the prepared cough syrup to a cup of hot water or tea. Mix all ingredients well before taking.
This copyrighted material may be reprinted by you for noncommercial use, if the following credit is given:
This article and recipe is an excerpt from Mrs. Tightwad's Handbook #2: HOW TO MAKE HOME REMEDIES THAT REALLY WORK. For more information, see the left sidebar on this site: http://purecajunsunshine.blogspot.com/
Friday, May 9, 2008
Adulturated honey looks, tastes and smells exactly like pure honey, and is more common than you think...
Adulterated Honey is found on more store shelves than ever before. Why is this happening? What can we do about it?
A recent survey shows that a little over 36% of commercial bee hives have been lost in the United States since last year. Last year wasn't so hot, either. The Apiary Inspectors of America reported a huge loss of about 32%.
This is shaking up the honey industry pretty hard, and rather than deal with it honestly, more than a few companies are turning to shady practices to keep afloat.
Adulterated honey has always been around, but is becoming more common these days. Many in the honey business are being stung harder than ever before where it hurts the most, in the wallet.
Cleverly adulterated honey, with a bit of high fructose corn syrup (HFCS) and quality flavorings added, can fool even the most sophisticated tastebuds. Done right, the doctored up honey can also fool the eye and nose. Often the only way to detect impure honey is by laboratory testing.
The sad thing is, although it's easy enough to test adulterated honey, catching the violators is the hard part.
Malcolm T. Sanford, professor, Institute of Food and Agricultural Sciences,
University of Florida nails it: "All too frequently, the trail leads to phantom producers and distributors, hiding behind false labels and cash transactions." Only when enough people contact food inspectors, legislators and other policy makers with solid information can some effective action be taken."
Here is some practical advice he wrote in a document published by the Entomology and Nematology Department, Florida Cooperative Extension Service:
As in the past, the beekeeping industry is the first line of defense against adulteration. A "self-policing" program, sponsored by the American Beekeeping Federation continues to be in effect. Suspicious honey is tested and, if found adulterated, the Federation notifies the proper officials and sends a report to the person who sent the sample for their follow-up. In spite of the recent adulterating activity, the Federation is receiving very few samples.
Feeding bees sugar syrup and/or HFCS and extracting "honey" containing these products is also adulteration. Thus, beekeepers cannot be too careful. Even small amounts of adulterants are detected by tests currently in use. It is impossible to tell adulterated honey by either taste, smell or color. The only real evidence comes from defined techniques certified by the National Association of Chemists. Experience has shown, however, that adulterated product has one or all of the following characteristics:
1. No flavor, just sweet.
2. Very light or very dark
3. Molasses flavor
4. Consistently low price
In addition to the above characteristics, adulterated honey has often been associated with "rustic" labels and "Mason" type jars. If you see suspicious product, contact :
American Beekeeping Federation
P.O. Box 1337, Jesup, GA 31598
Phone: 912-427-4233
Fax: 912-427-8447
Email: info@ABFnet,org
Web: http://www.abfnet.org
They may want a sample of it, along with this information:
Date ____________________
DESCRIPTION OF HONEY SAMPLE: (include the label or copy the information on printed label including size of package, brand, name and address of packer or distributor)_____________________________________________________ _________________________________________________________________
Where purchased:___________________________________________
Date purchased:____________________________________________
Code # on Jar or label_______________________
If only the packer's name appears on label, name and address of distributor:
____________________________________________________________ ____________________________________________________________
Reason why honey is suspected of being adulterated_____________ ______________________________________________________________
Name and Address of Sender_________________________________
Coming soon...amazing healing benefits and other uses for honey.
This copyrighted material may be reprinted by you for noncommercial use, if the following credit is given:
This article is an excerpt from Mrs. Tightwad's Handbook #1: HOW TO SURVIVE DISASTERS AND OTHER HARD TIMES. For more information, see the left sidebar on this site: http://purecajunsunshine.blogspot.com/
Thursday, May 8, 2008
Banging your head against the wall?
.
'tain't all that bad...
Banging your head against the wall uses 150 calories an hour.

'tain't all that bad...
Banging your head against the wall uses 150 calories an hour.
Saturday, May 3, 2008
Up-to-the-minute global earthquake news links
Get up-to-the-minute earthquake news from around the globe. Whoah...what a weird sensation it is to watch the pulsing red dots glowing all over the world to indicate currently occurring earthquakes! Check out this cool map from http://www.earthquake-news.net/
And this site has a nice view of the world's earthquake 'footprints'.
http://earthquake.usgs.gov/
http://earthquake.usgs.gov/sitemap.php
Here's one map from that site

And this site has a nice view of the world's earthquake 'footprints'.
http://earthquake.usgs.gov/
http://earthquake.usgs.gov/sitemap.php
Here's one map from that site

Monday, April 28, 2008
Are You As Prepared As You Think You Are?
This post is not meant to disturb you or gross you out . I apologize if parts of it seems to be unnecessarily harsh. It's a serious wake up call to help some of us look beyond ordinary disaster preps.
What will you do if your present best-laid plans fail, or after they are used up? You need to have some idea of Plan B, C & D! Here are some practical ideas that might help you to see your disaster preparations beyond 'Plan A'.
Most preps are temporary, having a life span of only (x) number days, weeks or years. Also, things like theft, bugs, mold, fires and other disasters can easily lay to waste our carefully made preparations.
If you are ever faced with a prolonged crisis, or a series of them that leave you with nothing but your two hands and a half of a mind...What will you do? If you are in good spiritual health, or otherwise strong of heart and mind...then you won't be likely to panic or suffer extreme despair. If you have the know-how to make sustainable preparations work well, and enough staying power, you'll have a greater chance of thriving the crisis at hand.
Truly useful preparations are sustainable. They are often of the kind that you carry in your head. Sometimes, knowledge can carry you further than any storebought disaster prep item.
Take for instance, the most important prep item: water. Instead of focusing only on things like collecting a gazillion empty soda pop bottles, and how many drops of bleach to use for purification, learn what you can about how you can to safely replace the saved water during the most austere of times.
Learn about indicator plants that reveal higher levels of moisture in the ground, and how to harvest it...Know how to make water catchment devices (rainbarrels, cisterns, ponds, or even earthworks like ditches and ridges to funnel water into an area). Get hydrology maps for your area, and study them. Visit alternate sources of water.
That sort of thing.
None of us are immune to severe survival challenges, and that's why we should seriously consider Plan B, C & D, possibly even more so than Plan A.
During good times, it is sometimes difficult to wrap the mind around unknown factors. To remedy that kind of shortsightedness, take a look at recent history. Wars, disasters, famines, and pestilences abounded throughout all of humankind's history.
One eye-opener for me was in an interesting book, When All Hell Breaks Loose by Cody Lundin. Here are a few excerpts that I hope will cause you to open your eyes a little wider, to look beyond the obvious, and to motivate you to gather more knowledge and sustainable preps. As a result, you may be more proactive in making your Plan B, C & D work.
Most people think of famine as ancient history, or something that happens only to third world countries. Notice that most of the following events happened not that long ago...and consider that these are just a few of many.
Here's a sobering look into our history, from Cody Lundin's book:
Europe, AD 1315-1322, The Great Famine
Bad weather and crop failure caused the death of millions of people by starvation, disease, infanticide, and cannibalism. At that time in Europe's history, famines were common and people were lucky to survive to the ripe old age of thirty. It seems that hard times knew no economic boundaries. In 1276, official records from the British royal family, society's wealthiest people at the time, recorded an average life span of thirty-five years.
Ireland, 1845-1849, The Great Potato Famine
Potatoes, the mainstay of the Irish diet, were inflicted with a potato blight that killed the crops. Local grain and livestock were owned by the English, and laws prevented the Irish from importing grain. The combination of crop disease and politics caused the death of 1.5 million people by starvation, cannibalism and disease.
USA, The Great Plains, 1930s
The United States experienced the worst drought of the twentieth century. The resulting lack of precipitation caused massive dust storms, which dominated the landscape, causing severe health problems while destroying crops and killing livestock. Death toll is unknown....
The Soviet Famine, 1932-1943
The Soviet Famine was initiated by Josef Stalin in an attempt to boost industrialization financed by forced collective farms in which grain production fell by 40 percent. His draconian measures included forbidding peasants to leave the country without permission; expelling, killing, or sending rich peasants to labor camps and forcibly seizing what little food remained to double grain exports to raise cash for his failed plan. The predicted chaos included a report issued by an Italian consul member in the Ukraine reporting "a growing commerce in human meat" and that people were killing and eating their own children. Astute authorities immediately responded, not with food, but by distributing posters that read: "Eating Dead Children Is Barbarism". Due to a national cover-up forbidding doctors to disclose on death certificates that the deceased had starved to death, numbers for the total dead are sketchy but estimates are at 5 to 8 million people, 10 to 25 percent of the population of the Ukraine.
The Warsaw Ghetto, 1940-1942
Three hundred eighty thousand Jews were confined to a 3.5. mile area that normally housed 160,000. The population eventually reached 445,000 before the Nazis sealed off the area with a ten-food wall, with the intention of starving all of the inhabitants within nine months. Official food rationing provided 2,613 kilocalories per day for Germans, 699 kilocalories per day for Poles, and 184 kilocalories for Jews in the Ghetto. Tens of thousands died from starvation and disease.
Northern China, 1958-1962
Chairman Mao's failed bid to "industrialize" his nation, along with several natural disasters and drought, killed an unbelievable 30 million people by starvation, disease, infanticide, and cannibalism. Desperate families swapped each other's children to eat, thus avoiding having to eat their kin....
Biafra (now Nigeria), Africa, 1967-1969
Civil war-caused famine kills one million people, leaving another 3.5 million to suffer from extreme malnutrition.
North Korea, 1994-1998
A combination of reduced Chinese and Russian food subsidies, along with the effects of collective farming, flooding, drought, and government corruption, caused an estimated 2 to 3 million people to die of starvation, disease, and cannibalism...
-------------- end of excerpts.
Because of weather, disease or politics, many more famines have occurred, or are happening now, and will happen again in one place after another.
Please don't suffer tunnel-vision and be caught mentally and physically unprepared if a (short or long term) famine comes to your neighborhood. Get ready for a short term crises with the obvious, but look beyond temporary preparedness for a longer lasting and more sustainable kind.
This post was not aimed at increasing worry levels, but to kick up awareness/preparedness levels a notch or two...
Like I said before, if you are in good spiritual health...then you won't be likely to worry needlessly, or suffer despair. Worry is so destructive, and accomplishes nothing good; on the other hand, being fully aware with eyes wide open can be a good thing, and may lead to workable solutions.
I'll wager that most of us have already thought about these things. But I suspect that some of us are preparing pretty much for a temporary event or two, and that 'everything will return to normal' after the dust settles...
It won't. The scene of this world is changing too much, too fast. There are 'new normals' being set every day.
Your ability to adapt to these 'new normals' may well depend upon how sustainable your Plans B, C and D are...in addition to your spiritual health.
This copyrighted article may be reprinted by you for noncommercial use, if the following credit is given:
This article is an excerpt from Mrs. Tightwad's Handbook #1: HOW TO SURVIVE DISASTERS AND OTHER HARD TIMES. For more information, see the left sidebar on this site: http://purecajunsunshine.blogspot.com/
Sunday, March 9, 2008
Survival and Preparedness Wit and Wisdom
.
These are a few of my favorite bits of wit and wisdom. They drive home some pretty good maxims of a preparedness lifestyle. Here's hoping you'll enjoy these as much as I do.
The more you carry in your head, the less you carry on your back.
--Jack Mountain Bushcraft and Guide Service
It is better to have it and not need it than to need it and not have it.
The difference between adventure and disaster is being prepared.
Last minute preparations are like learning to swim when you are drowning.
Chance favors the prepared mind. --Louis Pasteur
A lack of prior planning on your part does not constitute an emergency on my part.
When it does hit the fan, it will not be evenly distributed.
On the job training doesn's work when you're dealing with survival.
--Duncan Long "Backpack Survival"
Don't prepare to survive the bad times, prepare so that you don't even notice them, by living a simpler lifestyle.
Blessed are the flexible, for they don't get bent out of shape.
Adversity can lead to the discovery of strengths that you did not know you had.
--Al Siebert "The Survivor Personality"
Just when the caterpillar thought the world was over, it became a butterfly.
A testimony is what's left after the test.
The best way to win a gunfight is by not being there. --John Farnham, firearms expert
If we could just get everyone to close their eyes and visualize world peace for an hour, imagine how serene and quiet it would be...until the looting started.
Everything will be OK in the end. If it is not OK, it's not the end.
What are your favorite survival and preparedness proverbs, funnies, witty sayings, or bits of wisdom? Please share them with us using the 'comments' link just below this post!
Sunday, February 17, 2008
Emergency Disinfection of Drinking Water: How long do you REALLY need to boil water to purify it?
There are so many conflicting guidelines for emergency disinfection of drinking water, that many people may decide to boil water longer than is necessary, just to be on the safe side.
In most crisis situations fuel may be in very short supply, so knowing exactly how long to boil water to safely purify it may prove to be helpful.
The United States Center For Disease Control and Prevention (CDC) and the US Environmental Protection Agency (EPA) recommends boiling water for 1 minute, or 3 minutes above 2 kilometers (6562 feet) to disinfect water for drinking.
The CDC recommends boiling water for one minute to kill most organisms. One minute is long enough to kill all major harmful waterborne bacteria and protozoa including Esherischia coli, Salmonella, Shigella sonnei, Campylobacter jejuni, Yersinia enterocolitica, Vibrio cholerae, Legionella pneumophila, Cryptosporidium parvum, Giardia lamblia, Entamoeba histolytica and other pathogens.
Waterborne viral pathogens such as hepatitis A, which is known to be one of the more heat-resistant viruses, are also inactivated by one minute of boiling.
If you can't boil water for drinking, here is what the CDC recommends:
"If you can't boil water, you can treat water with chlorine tablets, iodine tablets, or unscented household chlorine bleach (5.25% sodium hypochlorite). If you use chlorine tablets or iodine tablets, follow the directions that come with the tablets. If you use household chlorine bleach, add 1/8 teaspoon (~0.75 milliliter [mL]) of bleach per gallon of water if the water is clear. For cloudy water, add 1/4 teaspoon (~1.50 mL) of bleach per gallon. Mix the solution thoroughly and let it stand for about 30 minutes before using it. Treating water with chlorine tablets, iodine tablets, or liquid bleach will not kill many parasitic organisms. Boiling is the best way to kill these organisms."
Unfortunately liquid bleach has a fairly short 'shelf life', but granular calcium hypochlorite lasts a long time. The EPA has easy to follow guidelines for using it for emergency disinfection of drinking water. Several methods are discussed here, including using granular calcium hypochlorite to disinfect water. Calcium hypochlorite is the main ingredient in 'pool shock', a powdered product commonly sold to disinfect swimming pools.
Caution: Use only 'high test' calcium hypochlorite that contains a minimum of 70 percent, preferably 78% available chlorine.
Here is what the EPA says about using granular calcium hypochlorite to disinfect water:
Make a concentrated 'stock' solution (liquid bleach):
Add and dissolve one heaping teaspoon of high-test granular calcium hypochlorite (approximately ¼ ounce) for each two gallons of water, or 5 milliliters (approximately 7 grams) per 7.5 liters of water. The mixture will produce a stock chlorine solution of approximately 500 milligrams per liter, since the calcium hypochlorite has available chlorine equal to 70 percent of its weight. To disinfect water, add the chlorine solution in the ratio of one part of chlorine solution to each 100 parts of water to be treated. This is roughly equal to adding 1 pint (16 ounces) of stock chlorine to each 12.5 gallons of water or (approximately ½ liter to 50 liters of water) to be disinfected.
Mix the treated water thoroughly and allow it to stand, preferably covered, for 30 minutes. The water should have a slight chlorine odor. If not, repeat the dosage and allow the water to stand for an additional 15 minutes. If the treated water has too strong a chlorine taste, allow the water to stand exposed to the air for a few hours or pour it from one clean container to another several times.
This copyrighted article may be reprinted by you for noncommercial use, if the following credit is given:
This article is an excerpt from Mrs. Tightwad's Handbook #1: HOW TO SURVIVE DISASTERS AND OTHER HARD TIMES. For more information, see the left sidebar on this site: http://purecajunsunshine.blogspot.com/
Wednesday, February 6, 2008
How to Keep Rabbits, Dogs, Cats, Deer and Other Critters Out Of The Vegetable Garden The EZ Way
I discovered that most critters will not walk over a solid border of prickly, stick-it-to-em pine cones, or other weird stuff. Tenderfooted dogs, cats and rabbits hate walking on those prickly pine cones! I have more of a rabbit problem than a dog or cat one, so I make my pine cone barrier a bit wider than a rabbit-jump across. Fresh pine cones keep their wonderful prickly, stick-it-to-em nature for about two years before softening and losing their 'bite'. Every year, I add more pine cones to my arsenal, and remove the really old ones. I use the 'spent' pine cones as handy dandy firestarters in my wood stove.
No pine cones? Use scrap fencing material. Cats and rabbits especially hate to walk on chicken wire fencing material that has been laid down sort of loose and floppy-like. Most dogs don't like to walk on it either, but it works only if it is really sproingy-boingy, and not laid down perfectly flat.
Because I have moved to a lots-of-bears wilderness area, I also use the same 'barrier principle' to keep the deer and bears out of certain areas, by laying scraps of fence material on the ground. The deer positively hate walking where their hooves can get tangled up in it... I find I don't need to completely cover the ground with the barrier material, just enough pieces here and there, to get the message across that this ground is not easy to navigate through. Use any kind of fencing material that is larger than chicken wire.
One night as I slept, a bear got its claws hung up in a ground barrier of scrap fence material. That must have been one highly irritated bear. It flung fence wire everywhere, and tracks indicated it was not a short struggle. Dang. I missed the whole show.
Note to self: put up game camera.
Heh. Most people wanna keep fences up; sometimes I find they work better laying on the ground. Tip: don't lay the material too flat. The more bumps and humps, the better...
This article is an excerpt from the Gardening During Hard Times section of Mrs. Tightwad's Handbook #1: How To Survive Disasters and Other Hard Times.
This copyrighted material may be reprinted by you for noncommercial use, if the following credit is given:
This article is an excerpt from Mrs. Tightwad's Handbook #1: HOW TO SURVIVE DISASTERS AND OTHER HARD TIMES. For more information, see the left sidebar on this site: http://purecajunsunshine.blogspot.com/
Monday, January 28, 2008
How I Grind Grain The Old Way With Handheld Grinding Stones
I have a pair of very old grinding stones that I use from time to time to grind parched corn, bulgur (cooked and dried wheat berries), and other such things. Grinding raw wheat into flour by hand is hard work! Grinding dried field corn with it is easier, and grinding millet and parched corn is easiest of all.
My larger grinding stone is about the size of a car's steering wheel, with a depression hollowed out caused from years of use. Eventually, the action of the smaller handheld stone grinding all the grains, acorns and whatever else against the larger stone formed a handy hollow in the larger stone, making the job easier than if it were just a plain flat rock...
If the stones are reasonably hard, and not apt to bits crumbling or flaking off as you work, any two stones with a slightly rough texture should get the grinding job done. From a bit of trial and error, I learned that a gentle thud with the handheld rock smacked against the grains (that are sitting in the little hollow in the larger stone), then a pushing or dragging action of the smaller handheld stone against the larger one, with the grains inbetween the rocks, does a pretty good job of rendering any grain to flour...
My old antique grinding stones are of Native American origin and were originally used to grind softer stuff than wheatberries...such as dried acorns that had the tannins leached out, and wild grass seeds, corn, and certain roots. That's what I use them for, and they do the job well!
This copyrighted article may be reprinted by you for noncommercial use, if the following credit is given:
This article is an excerpt from Mrs. Tightwad's Handbook #1: HOW TO SURVIVE DISASTERS AND OTHER HARD TIMES. For more information, see the left sidebar on this site: http://purecajunsunshine.blogspot.com/
Tuesday, January 15, 2008
How To Convince Others To Prepare For Disasters and Other Hard Times
There are many intelligent people in this world who are still finding the idea of pandemics, crippling terrorist events, economic collapse, or any other heavy-duty scenario a mite hard to bite into...'tis so incredibly and wildly horrific! Who can blame them?
Some people's "tipping points" are built differently. If they are fortunate, they have a caring and knowledgeable friend or relative who is willing to nudge and point, and if needed, push, shove and show what can and should be done with what resources they have.
To some people, 'PREP' is just another four letter word. If ya just spell it a little differently, it might appeal to those folks a bit more.
There's Social Security and...there's grocery security!!!
Use buzz words like "Insurance you can eat", or a "hedge against inflation", or "money in the pantry", or something like that...
Next week, or maybe next month, some might feel differently about accepting (and preparing for) the very real possibility of the really "scary" kind of scenarios.
Some will never wake up until TSHTF (the stuff hits the fan) ...and they will likely be one of your biggest problems. Count on it.
Heh. I'm preparing for that eventuality now.
I have recipes for Cricket Jambalaya and Grasshopper Gumbo, and I am not afraid to use them. My family and friends know this, and that is a good thing. The mental imagery of eating these things in a SHTF situation helps to ensure that I won't be overrun with too many unprepared and empty-handed guests, in the event a severe and widespread event has them 'fleeing to the hills'.
This may be reprinted by you for noncommercial use, if the following credit is given:
This article is an excerpt from Mrs. Tightwad's Handbook #1: HOW TO SURVIVE DISASTERS AND OTHER HARD TIMES. For more information, see the left sidebar on this site: http://purecajunsunshine.blogspot.com/
Thursday, January 10, 2008
If You Are On a Diet, Do Not Read This
Millions of Americans are overweight, but in the event of a widespread or prolonged disaster situation, that might not be a bad thing.
Being 50 lbs overweight will buy almost an extra month of survival in austere conditions...
Two pounds of extra body weight will sustain most people for a day without food. If a person is 50 pounds overweight, that might buy another 25 days or so, because the body will utilize its own fat reserves...if you don't croak with the bad side effects of being overweight, first. Hauling fifty pounds all day is hard work.
This may be reprinted by you for noncommercial use, if the following credit is given:
This article is an excerpt from Mrs. Tightwad's Handbook #1: HOW TO SURVIVE DISASTERS AND OTHER HARD TIMES. For more information, see the left sidebar on this site: http://purecajunsunshine.blogspot.com/
Tuesday, January 1, 2008
The Fun Way to Repel Trespassing Dogs and Cats
This trick won't work for everyone, but if you live in a rural area that is not under a 'burn ban' or high fire risk area, it's guaranteed to train fourlegged trespassers to keep off your property. They may even leave the county.
Near my door, I keep a small supply of those really small 'black-cat' sized firecrackers on skinny red sticks (whatyoucallits?), along with a handy Bic lighter. These firecrackers are very small but loud (wheeeeeBANG) and very showy.
When a stray or neighbor's dog show up on the property, I light one of these little firecrackers and let 'er rip. Because it makes such a hellacious racket and frightening looking show before it even hits the ground, the dog usually resembles a virtual cartoon character, hightailing it out of there so fast, sometimes yelping, imagining it has been shot or something.
No one gets hurt, not even a hair singed on 'nary a dog or cat...but one by one, I am educating most of the fourlegged trespassers in this community: "Stay away from PureCajunSunshine's place!".
These small firecrackers do a good job of sending a dog or cat packing (usually for good; only the really dumb ones return). The critters needing a higher education get the two or three firecracker treatment. It works, and I get a load of entertainment, especially when the cats come around. Quite spectacular! I never saw anything run so fast as a cat that imagines it's about to be hit by a real live meteor from outer space.
Subscribe to:
Posts (Atom)